
.htaccess File -How to Create & Edit for WordPress.
The .htaccess file handles server configuration and WordPress website requests. It controls various server-side functionalities, including URL redirection, server signatures, file caching, password protection, and customizing error pages.
Editing and modifying a .htaccess file is typically done to grant or revoke access to website resources. The leading dot means the file is hidden (dotfile). Adjust the settings of the default file manager to make the file visible and editable.
Here are some common uses of the .htaccess file in WordPress:
Permalink Structure: WordPress uses pretty permalinks to make URLs more user-friendly and SEO-friendly. The .htaccess file is used to rewrite URLs to support this permalink structure. WordPress automatically generates the necessary rules and adds them to the .htaccess file when you update your permalink settings in the WordPress dashboard.
Security Enhancements: .htaccess can be used to add security measures to your WordPress site. This might include restricting access to certain files or directories, preventing directory listing, blocking specific IP addresses or user agents, and more. However, many security measures in WordPress are handled through plugins or server-level configurations rather than directly in the .htaccess file.
Redirections: You can set up redirects using the .htaccess file in WordPress. This is useful for redirecting old URLs to new ones after restructuring your site or when changing domain names. Redirections can help maintain SEO value and ensure a smooth user experience.
Caching and Compression: .htaccess can be used to implement caching and compression techniques to improve website performance. This includes browser caching, gzip compression, and leveraging caching headers. However, many caching and performance optimization tasks in WordPress are often handled by caching plugins.
Hotlink Protection: Just like in general web development, you can use .htaccess in WordPress to prevent hotlinking of your images and other media files. This helps conserve bandwidth and protect your content from being used without permission on other sites.
Custom Error Pages: You can customize error pages using .htaccess, providing a better user experience when visitors encounter errors like 404 Not Found or 403 Forbidden.
Blocking Bad Bots: .htaccess can be configured to block or restrict access to known malicious bots or crawlers, helping to protect your site from spam or other malicious activities.
It’s important to note that while the .htaccess file can be powerful, improper configuration can cause issues with your WordPress site. Always make sure to back up your .htaccess file before making any changes, and test thoroughly to ensure that your site continues to function as expected. Additionally, some web hosts may have restrictions on the use of .htaccess files or may provide alternative methods for achieving similar functionality.
How to Find WordPress .htaccess File
The .htaccess file is in the root directory of a WordPress installation. To find the file, modify the default file manager settings to make hidden files visible.
o find the .htaccess file using cPanel, follow the steps below:
1. Log in to the cPanel dashboard using your credentials.
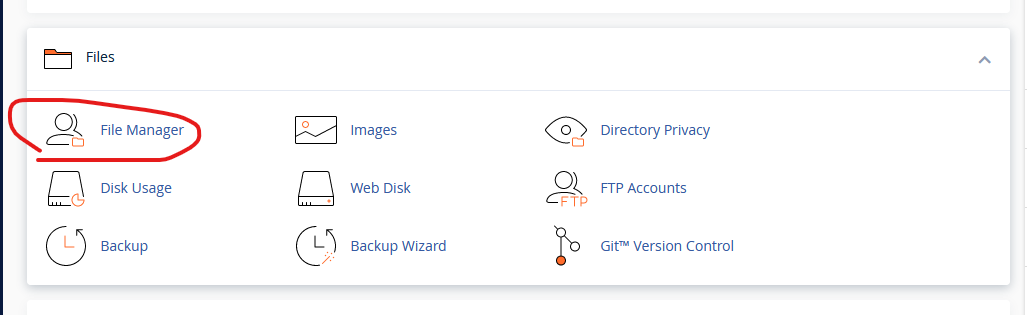
2. In the Files section, locate and open the File Manager.
3.Find and select the folder related to the WordPress installation (usually www or public_html). If it is not immediately visible, the file is hidden.
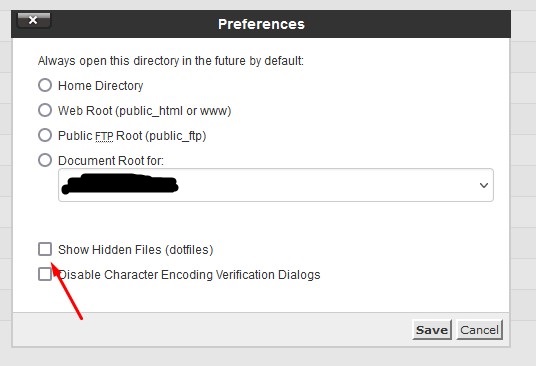
4. To make the file visible, click the Settings button in the top right corner.
5. Check Show Hidden Files and click Save.
The file is now visible in the current folder.
How to Create a Default WordPress .htaccess File
In some instances, WordPress does not create the default .htaccess file, or it is deleted. See the steps below to create a .htaccess file manually:
1. Navigate to the WordPress root installation folder (public_html or www).
Note: Ensure that hidden files are visible. Refer to the previous section to see instructions on how to show hidden files.
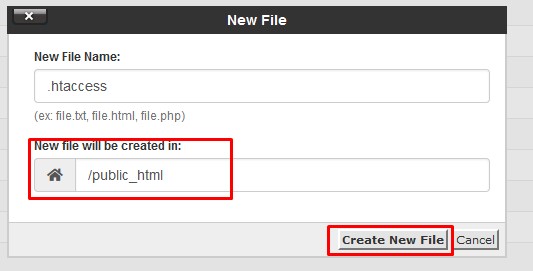
2. Click the + File button in the upper-left corner to create a new file.
3. Name the file .htaccess and click Create new file.
4.Open the file for editing. If using cPanel, select the file. Click Edit in the top bar or right-click the file, then Edit.
5. Add the following to the file:
# BEGIN WordPress
RewriteEngine On
RewriteBase /
RewriteRule ^index\.php$ – [L]
RewriteCond %{REQUEST_FILENAME} !-f
RewriteCond %{REQUEST_FILENAME} !-d
RewriteRule . /index.php [L]
# END WordPress
The provided code is the default .htaccess that WordPress generates automatically. It handles permalink structures and URL rewriting.
6. Save the file and exit.
How to Edit WordPress .htaccess File
Editing the .htaccess file allows customizing server configuration and enables adding various functionalities to a WordPress website. Follow the instructions below to edit the .htaccess file in cPanel and with an FTP client.
Editing .htaccess in cPanel
To edit the .htaccess file in cPanel, do the following:
1. Save a copy to the local machine before making any changes. Select the .htaccess file, right-click it, and choose Download.
The saved copy serves as a backup in case of any errors.
2. Edit the original .htaccess file in cPanel. Right-click the file, then click the Edit button to adjust it.


