Adjusting LFD Notifications for Load Levels
Adjusting LFD Notifications is simple and easy to update. LFD (Login Failure Daemon) is a process that runs on Linux servers. Together with ConfigServer Security and Firewall (CSF), LFD helps to monitor the security of your server and notify you of potential issues.
While primarily monitoring login and firewall issues, LFD also monitors a number of other services on the server, including Load Level.
While the default Load Level settings on our Linux servers are generally appropriate for most situations, issues sometimes arise when a server is improved or resized. It is possible that LFD will begin sending “false positive” warnings about the average load level on the server, even though the server has plenty of capacity to handle the current load. The error can occur when an especially large or powerful server is using older settings for the PT_Load_Level setting. We’ll show you how to check for this type of error.
Below is the procedure to adjust LFD Notifications
Check Number of CPU Cores
The first step to determining your correct PT_Load_Level setting is to verify the number of processor cores your server is using. The simplest way to find this information is to go to WHM and check the Server Information.
- Login to WHM.
- Type “Server Information” into the search bar at the top left of the screen.
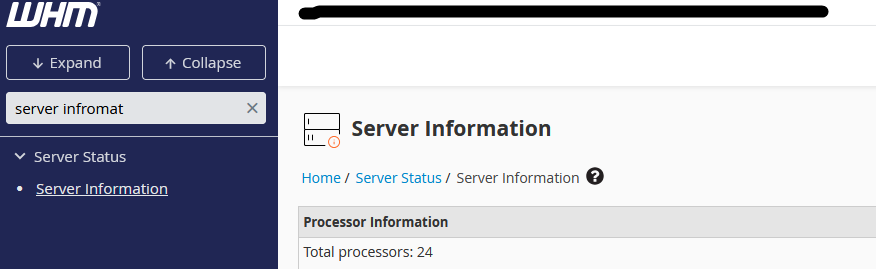
3.Click Server Information. Check the number of processors listed.
4.Divide the number of processors by 2 to find the number of CPU cores (WHM typically counts hyperthreads as processors, so the number of processors listed is usually double the number of processor cores). In our example, 20 processors would equal 10 CPU Cores.
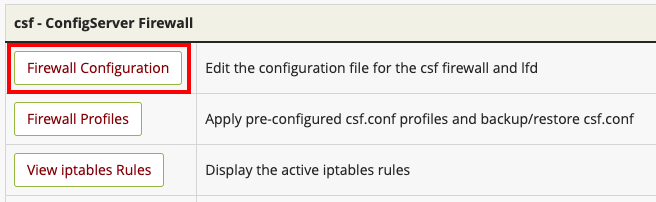
If you want to adjust LFD notifications for different load levels, here’s how you can manage that through the CSF configuration:
3.Modify Load Level Settings in CSF Configuration:
-
- To adjust the threshold at which LFD sends notifications based on system load, you’ll need to edit the
csf.conffile, typically located in/etc/csf/csf.conf. - Look for the parameter
PT_LOADand change its value.
- To adjust the threshold at which LFD sends notifications based on system load, you’ll need to edit the
Example:
PT_LOAD = "6"
This setting defines the load threshold that will trigger LFD to send notifications. The number 6 represents the load average; you can increase or decrease this value depending on your system’s capacity.
- Find the PT_Load Settings (the simplest way is to use your browser’s search function).

- set LFD Notification for Different Load Levels:
- You can configure separate notification settings for different load levels. For example, you can specify at which load level the daemon should send alerts, block IPs, or take other actions.
- You might want to adjust the parameters related to system load in
csf.confsuch as:LF_ALERT_TO(who receives the email alerts)LF_ALERT_FROM(who the alerts appear to come from)LF_EMAIL_ALERT(if set to “1”, it enables email alerts)LF_ALERT_INTERVAL(sets the interval in seconds for repeated alerts on high load)
- Adjust Email Alerts for High Load:
- The LFD can be configured to only send email alerts when a certain load threshold is reached, using the
PT_LOAD_ALERTparameter incsf.conf.
- The LFD can be configured to only send email alerts when a certain load threshold is reached, using the
PT_LOAD_ALERT = "7"
- This will send an alert if the system load reaches or exceeds 7.
- Restart LFD and CSF:
- After making these changes, restart LFD and CSF to apply the new settings:
csf -r

That’s it now the LFD notifications was updated. I hope this will help you to modify the LFD notifications in CSF.
If you would like to monior your server in WHM and how to do it. click.


